
The Secret Hidden in a Handful of Walnuts
The Secret Hidden in a Handful of Walnuts For generations, people have looked at the unique shape of a walnut…
27/05/2026 13:06
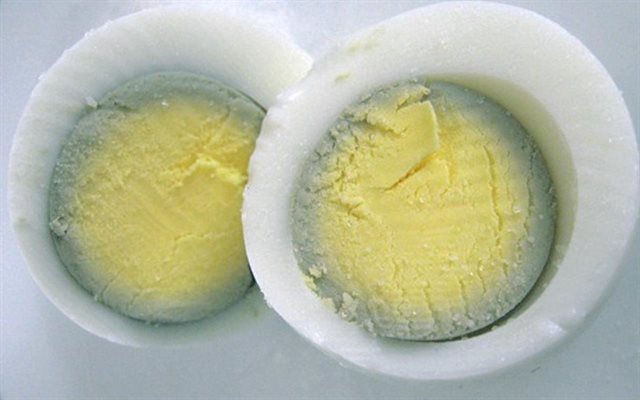
Have you ever peeled a hard-boiled egg only to find a dull, grayish-green halo coating the yolk? It is a common kitchen sight that can instantly make a breakfast look less than appetizing. While it might look like a sign of spoilage or a faulty egg, this discoloration is actually a basic chemical reaction.
Understanding why this green ring forms, how it impacts your food, and how to prevent it can elevate your culinary skills and eliminate kitchen waste.

The green ring around a hard-boiled egg yolk is entirely harmless and is caused by a natural chemical reaction between the elements inside the egg. It is not an indicator of bacteria, disease, or a bad egg.
When an egg is heated, the proteins inside the white and the yolk begin to change structure. This process releases specific elements that eventually meet and react at the boundary where the yolk touches the white.
Hydrogen Sulfide from the White: The proteins in the egg white contain sulfur. As these proteins cook and break down, they release hydrogen sulfide gas.
Iron from the Yolk: The egg yolk is naturally rich in iron.
The Intersection: As the egg continues to heat, the hydrogen sulfide gas from the white migrates inward toward the center of the egg. When it reaches the surface of the iron-rich yolk, the two elements combine.
This reaction creates ferrous sulfide (iron sulfide). Ferrous sulfide has a distinct grayish-green hue, which deposits itself perfectly on the outer surface of the yolk, creating the infamous ring.
While the chemical reaction is natural, the appearance of the green ring is completely controllable. It only happens under specific cooking conditions.
Leaving eggs in boiling water for too long is the primary cause of the discoloration. The longer the egg cooks, the more hydrogen sulfide gas is generated in the white, and the more time it has to travel inward to react with the iron in the yolk.
Boiling eggs at a violent, rolling boil accelerates the breakdown of sulfur-containing proteins. High heat pushes the gas toward the yolk much faster than gentle simmering does.
Even if you turn off the stove at the perfect time, the residual heat trapped inside the eggshell will continue to cook the egg. If you leave hot eggs to sit on the counter to cool down naturally, the interior stays hot enough for the ferrous sulfide reaction to continue taking place.

The Short Answer: Yes, absolutely.
It is completely fine to eat hard-boiled eggs that have a green ring around the yolk. The ferrous sulfide compound is non-toxic in these quantities.
However, while it will not compromise your wellness, overcooking does affect the overall quality of your meal:
Texture: The yolk becomes dry, chalky, and crumbly instead of creamy and smooth. The white can become rubbery and tough to chew.
Flavor and Aroma: Overcooked eggs release a much stronger, more pungent sulfur aroma (often described as a “rotten egg” smell, even though the egg is perfectly fresh).
To achieve a bright yellow yolk with a tender white, you need to control the cooking duration and cool the egg rapidly. Here are the two most reliable methods used by culinary professionals.
This is the most reliable method to ensure even cooking without exposing the egg to excessive, prolonged heat.
[Place eggs in pot] -> [Cover with cold water] -> [Bring to a boil]
                                                            |
[Cool in ice bath]  <-  [Let sit for 10-12 mins]  <-  [Remove from heat]
Place your eggs in a single layer at the bottom of a saucepan.
Add cold water to the pan, ensuring it covers the tops of the eggs by at least one inch.
Place the pan on the stove over high heat and bring the water to a full, rolling boil.
As soon as the water reaches a boil, remove the pan from the heat source completely and cover it with a tight-fitting lid.
Let the eggs sit undisturbed in the hot water.
For medium eggs: 9 minutes.
For large eggs: 12 minutes.
For extra-large eggs: 15 minutes.
No matter which boiling method you prefer, an ice bath is a mandatory step to stop the cooking process instantly.
While the eggs are sitting in the hot water, prepare a large bowl filled with cold water and plenty of ice cubes. As soon as the cooking timer goes off, use a slotted spoon to transfer the eggs directly from the hot water into the ice bath.
Let the eggs submerge in the icy water for at least 15 minutes before peeling. This rapidly lowers the internal temperature of the egg, halting the migration of sulfur gas and preventing the green ring from forming.
To get your desired yolk texture without any discoloration, use this simple time guide based on placing eggs into boiling water and simmering gently:
| Desired Yolk Style | Boiling Time | Visual Appearance |
| Soft-Boiled | 6 Minutes | Liquid, runny yolk with set whites |
| Medium-Boiled | 8 Minutes | Custard-like, jammy center |
| Hard-Boiled (Perfect) | 10 Minutes | Pale yellow, creamy, firm center |
| Overcooked | 14+ Minutes | Chalky texture, grayish-green ring |
Achieving the perfect hard-boiled egg requires balancing heat energy with quick cooling. By monitoring the time your eggs spend in hot water and dropping them into an ice bath immediately afterward, you can enjoy beautiful, golden yolks every single time.
The Secret Hidden in a Handful of Walnuts For generations, people have looked at the unique shape of a walnut…

Have you ever peeled a hard-boiled egg only to find a dull, grayish-green halo coating the yolk? It is a…

The Ultimate Morning Fuel Choosing the right food for your first meal sets the tone for your entire day. A…

Have you ever wondered about those flat, woven bands near the edges of your favorite bath towels? You are definitely…
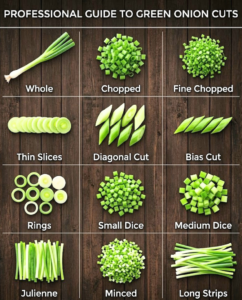
Green onions may look simple, but professional chefs say the way they are cut can dramatically affect: flavor strength, texture,…

I’m a 40-year-old mom, and I thought my 13-year-old was just having innocent sleepovers at her best friend’s house—until her…